Installation Instructions
The following are procedures and instructions for installation of our flexible trim mouldings.
--All material can be stained, painted, and/or sanded as desired. NOTE: Woodgrain texture is only on surface and will be eliminated if surface is sanded.
--For best results, the use of construction type adhesive in addition to pneutmatic pin nailing is recommended. Use of tape or clamps may be helpful in securing material in position while adhesives bond. NOTE: DO NOT OVER NAIL.
--Nails should be kept at least 6" apart and 3/8" from any edge. Material may crack if nails are too close to an edge. Pre-drilling is not necessary when using #6 or smaller finish nails. We recommend using pneumatic pin nailers along with construction adhesive. DO NOT USE STAPLE GUNS.
--Our flexible moulding can be cut, shaped or sanded using any woodworking equipment. When painting, primer coats are not necessary and all paints are compatible. When staining, a heavily pigmented stain is required. The flexible moulding may not absorb stain as rapidly as some woods and may require additional coats to match wood properly. Artist oils and paint pigments also work well for staining. Finish with a clear coat product. Best results occur with spray equipment.
--Material is less flexible when installed at temperatures below 55 degrees F. Before installing allow material to reach room temperatures of between 55-90 degrees F.
Installation Tips - Half Round and Arcs
Installation Tips - Crown Mouldings
 Installation Using GEL Super Glues
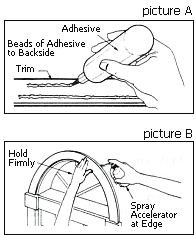
Apply bead of adhesive where moulding bonds to wallboard and another bead where moulding bonds to jamb or window (see picture A). Put into position and hold firmly until adhesive sets (approx. 2 minutes). Increase the cure rate to 5 - 10 seconds by spraying accelerator at edge between moulding and wallboard (see picture B).
By using the GEL Super Glues nailing and nail holes are eliminated.